amibroker

HomeKnowledge Base

Indicators based on user values rather than standard OHLC prices

Sometimes we may want to calculate indicators based not only on standard OHLC prices but on some other user-definable values. Some functions like RSI or CSI have additional versions (RSIa, CCIa respectively) that accept custom input array. In this case it is very easy to calculate the indicator based on user defined value. For example RSI from average of High and Low prices could be written as follows:

customArray = ( High Low ) / 2;

PlotRSIacustomArray14 ), "RSI from (H+L)/2"colorRed )

But many of the built-in indicators available in AFL as functions refer indirectly to standard OHLC arrays and their parameters do not offer array argument as one of inputs.

Fortunatelly there is an easy way to provide custom array as input for any other built-in functions. For this purpose, it is enough to override OHLC arrays (or just Close if the indicator only uses Close as input) within the code before calling given function and assign our custom array. As a simple example, let us consider calculating MACD indicator out of average of High and Low prices as input.

procedure SaveRestorePricesDoSave )
{
  global 
SaveOSaveHSaveLSaveCSaveV;

  if( 
DoSave )
  {
     
SaveO Open;
     
SaveH High;
     
SaveL Low;
     
SaveC Close;
     
SaveV Volume;
  }
  else
  {
    
Open SaveO;
    
High SaveH;
    
Low SaveL;
    
Close SaveC;
    
Volume SaveV;
  }
}

// save OHLCV arrays
SaveRestorePricesTrue );

// calculate our array
customArray = ( High Low ) / 2;

// override built-in array(s)
Close customArray;

// calculate our function, MACD and Signal in this case
PlotMACD1226 ), "MACD"colorRed );
PlotSignal1226), "Signal"colorBlue );

// restore OHLCV arrays
SaveRestorePricesFalse )

The code first calculates the custom array (we use just use average of High and Low prices in this example, but of course the calculations may be more complex), then assigns the result of these calculations to Close overriding the regular values stored in close array. Then – when we call MACD() function which uses Close as input – it will be based on the modified values.

The above operations do not affect the underlying database at all – the prices are overridden only for the purpose of calculation of this particular formula and other charts / indicators are not affected at all.

Using per-symbol parameter values in charts

Parameter values in AmiBroker are stored separately for each ChartID. A ChartID is a number that uniquely identifies chart. This makes it possible that parameters having same name can hold different values when they are used in different charts (different ChartIDs). This also allows to share parameters if two panes use same ChartID. (A detailed explanation can be found here: http://www.amibroker.com/kb/2014/10/06/relationship-between-chart-panes/ )

For this reason, if we want to have separate chart parameters for each symbol, we need to set up separate chart for every symbol. To do so, follow these steps:

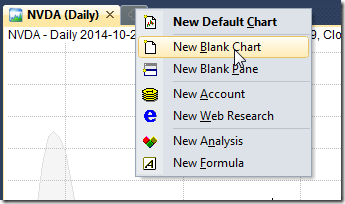
  1. create several new chart windows using File->New->Blank Chart (or choosing New Blank Chart from the menu under + button in MDI tabs area)
    New Blank Chart

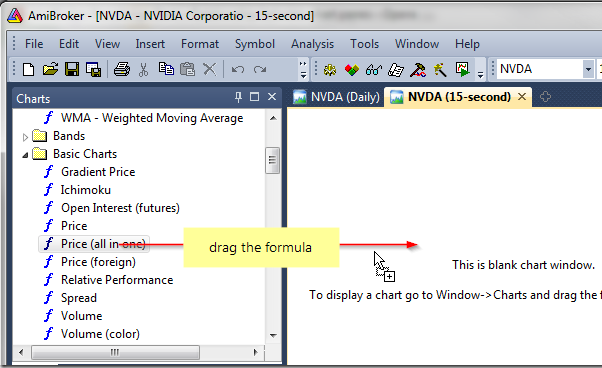
  2. drag Price( all in one) formula or any other indicators onto each of the newly opened windows
    Drag-drop chart

  3. select different active symbol for every chart
  4. define parameters individually and save the whole layout in the Layouts window

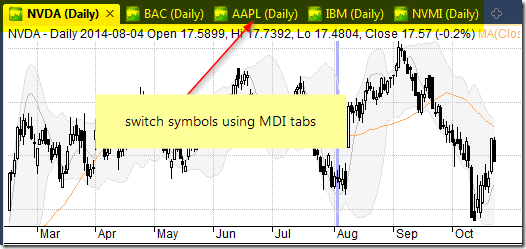
As a result – we have a setup of several chart windows, where we can quickly access given symbol showing chart with its separately stored parameters.

MDI Charts

There is also a way to handle the chart parameter values directly from the AFL formula, which would detect the active symbol and set the parameter values accordingly. Here is an example of such implementation using switch statement:
http://www.amibroker.com/guide/keyword/switch.html

To display this chart, open the Formula Editor, enter the following code and then press Apply Indicator button.

// detect the active symbol and store in n variable
Name();

// set parameter values based on the symbol name
switch ( )
{
// values for MSFT symbol
case "MSFT":
    
MA1periods 10;
    
MA2periods 21;
    break;

// values for IBM and NVDA
case "IBM":
case 
"NVDA":
    
MA1periods 30;
    
MA2periods 40;
    break;

// values for other tickers
default:
    
MA1periods 50;
    
MA2periods 100;
    break;
}

PlotClose"C"colorDefaultstyleBar );

PlotMACloseMA1periods ) , "MA(" MA1Periods ")" colorRed );
PlotMACloseMA2periods ) , "MA(" MA2Periods ")"colorBlue )

This way we can handle all individual parameter values within a single chart pane.

How to exclude top ranked symbol(s) in rotational backtest

Rotational trading is based on scoring and ranking of multiple symbols based on user-defined criteria. For each symbol a user-definable “score” is assigned on bar by bar basis. Then, each bar, symbols are sorted according to that score and N top ranked symbols are bought, while existing positions that don’t appear in top N rank are closed.

Sometimes however, we may want to exclude the highest ranking symbol (or a couple of them) from trading. The code below shows how to do that using custom backtester.

ExcludeTopN 1// how many top positions to exclude
SetCustomBacktestProc("");

if ( 
Status"action" ) == actionPortfolio )
{
    
bo GetBacktesterObject();
    
bo.PreProcess();

    for ( 
bar 0bar BarCountbar++ )
    {
        
Cnt 0;
        for ( 
sig bo.GetFirstSignalbar ); sigsig bo.GetNextSignalbar ) )
        {
            if ( 
Cnt ExcludeTopN )
                
sig.Price = -1// exclude

            
Cnt++;
        }

        
bo.ProcessTradeSignalsbar );
    }

    
bo.PostProcess();
}

EnableRotationalTradingTrue );

SetOption"MaxOpenPositions");
SetOption"WorstRankHeld"10 );
SetPositionSize20spsPercentOfEquity );
PositionScore RSI14 )

The code is pretty straightforward mid-level custom backtest loop but it uses one trick – setting signal price to -1 tells AmiBroker to exclude given signal from further processing. Note also that signals retrieved by GetFirstSignal / GetNextSignal are already sorted, so the highest ranked signal appears first in the list.

Time compression of data retrieved from another symbol

AmiBroker’s Time-Frame functions (http://www.amibroker.com/guide/h_timeframe.html) allow to use multiple intervals within a single formula and combine them together. Another set of functions in AFL (Foreign and SetForeign) allow us to retrieve data of another symbol from the database, so we can implement strategies where rules are based on multiple symbols.

This article shows how to combine these two features together and properly use Time-Frame functions on data retrieved from another symbol. Let us consider an example of a strategy, which works on daily data, but uses an additional filter based on weekly readings of S&P500 index.

The following sequence is required to code such conditions properly:

  1. switch to the other symbol with SetForeign
  2. compress data into higher interval with TimeFrameSet
  3. store the weekly values / conditions in custom variables
  4. with TimeFrameRestore() or RestorePriceArrays() functions restore the original arrays of the tested symbol (in the original time-frame)
  5. use custom variables assigned in step (3) expanded to original time-frame using TimeFrameExpand()

Here is the AFL formula, which implements the above conditions:

// first switch to ^GSPC symbol
SetForeign"^GSPC" );
//
// compress data to weekly interval
TimeFrameSetinWeekly );
//
// assign weekly values to custom variables
indexWeeklyClose Close;
indexWeeklyMA =  MAClose52 );
indexWeeklyFilter Close MAClose52 );
//
// restore original arrays (back to the primary symbol)
// RestorePriceArrays() function is an equivalent
TimeFrameRestore();
//
// align data back to original interval
indexFilterExpanded TimeFrameExpandindexWeeklyFilterinWeekly );
//
// exploration shows the results, note that all weekly values
// need to be expanded if we haven't done it yet
//
Filter 1;
AddColumnClose"Close AAPL" );
AddColumnTimeFrameExpandindexWeeklyCloseinWeekly ), "Weekly close ^GSPC" );
AddColumnTimeFrameExpandindexWeeklyMAinWeekly ), "Weekly MA ^GSPC" );
AddColumnindexFilterExpanded"Weekly index filter")

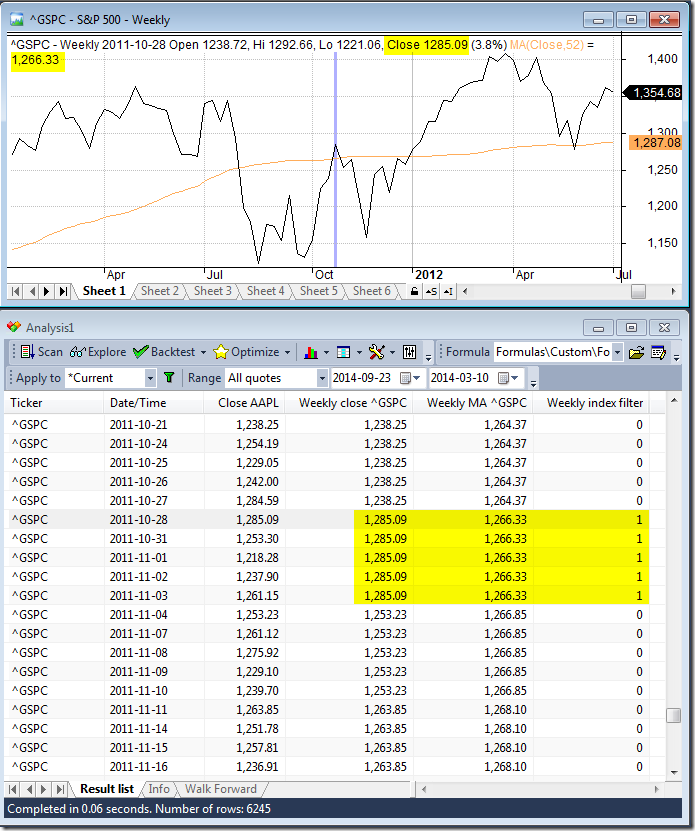
Let us compare the readings obtained from the code with a sample chart – both ^GSPC raw reading and 52-week MA values match the chart and the condition is properly aligned to the bars starting on 2011-10-28 and extends until new weekly bar is formed.

TimeFrame + Foreign

There is also an alternative method we can use:

  1. retrieve values from ^GSPC using Foreign() function
  2. compress these readings into weekly interval using TimeFrameCompress
  3. perform calculations on weekly compressed array
  4. expand the compressed data back to the original timeframe using timeFrameExpand
indexClose Foreign("^GSPC","C");
indexWeeklyClose2 TimeFrameCompressindexCloseinWeekly );
indexWeeklyMA2 MAindexWeeklyClose252 );
indexWeeklyFilter2 indexWeeklyClose2 indexWeeklyMA2;
//
Filter 1;
AddColumnClose"Close AAPL" );
AddColumnTimeFrameExpandindexWeeklyClose2inWeekly ), "Weekly close ^GSPC" );
AddColumnTimeFrameExpandindexWeeklyMA2inWeekly ), "Weekly MA ^GSPC" );
AddColumnTimeFrameExpandindexWeeklyFilter2inWeekly ), "Weekly index filter")

Using price levels with ApplyStop function

ApplyStop function by default requires us to provide stop amount (expressed in either dollar or percentage distance from entry price). Therefore, if we want to place stop at certain price level, then we need to calculate the corresponding stop amount in our code.

This example shows how to place stops at previous bar Low (for long trades) and previous bar High (for short trades).

Stop amount parameter is simply the distance between entry price and desired trigger price (exit point). For long trade it is entry price minus stop level, while for short trade it is trigger (exit) price minus entry price. Additionally we may check if calculated distance is at least 1-tick large. We can distinguish between long and short entry by checking if one of entry signals is present (if a Buy signal is active then it is long entry, otherwise short). We only need to take care about the fact that if we are using trade delays we need to get delayed Buy signal as shown in the code below:

TradeDelay 1// set it to 0 for no delays

SetTradeDelaysTradeDelayTradeDelayTradeDelayTradeDelay );
TickSize 0.01;

// sample entry rules
Buy CrossMACD(), Signal() );
Short CrossSignal(), MACD() );
Sell Cover 0// no other exit conditions, just stops

BuyPrice SellPrice ShortPrice CoverPrice Close;

// define stop level
stopLevelLong RefL, -); // use previous bar low
stopLevelShort RefH, -); // use previous bar high

// calculate stop amount
stopAmountLong BuyPrice stopLevelLong;
stopAmountShort stopLevelShort ShortPrice;

// make sure stop-amount is at least one tick
stopAmountLong MaxTickSizeBuyPrice stopLevelLong );
stopAmountShort MaxTickSizestopLevelShort ShortPrice );

// assign stop amount conditionally by checking if there is a Buy signal on given bar
IsLong RefBuy, -TradeDelay );
stopAmount IIfIsLongstopAmountLongstopAmountShort );
ApplyStopstopTypeLossstopModePointstopAmountTrue )

Per-symbol profit/loss in a portfolio backtest

Backtesting engine in AmiBroker allows to add custom metrics to the report, both in the summary report and in the trade list. This is possible with Custom Backtester Interface, which allows to modify the execution of portfolio-level phase of the test and (among many other features) adjust report generation.

The example presented below shows how to retrieve individual profit/loss figures for each traded symbol in a portfolio test and add the results as custom metrics to the report. The code performs backtest, then iterates through the list of trades and stores each symbol profit in separate variables. Variables are created with VarSet function, which allows to build variable names dynamically, based on the symbol name. There are 2 variables generated per symbol, one holding profit for long trades and one for short trades. In the last part the code reads the created variables and adds input into the backtest report.

function ProcessTradetrade )
{
  global 
tradedSymbols;
  
symbol trade.Symbol;
  
//
  
if( ! StrFindtradedSymbols"," symbol "," ) )
  {
    
tradedSymbols += symbol ",";
  }
  
//
  // HINT: you may replace it with GetPercentProfit if you wish
  
profit trade.GetProfit();
  
//
  
if( trade.IsLong() )
  {
      
varname "long_" symbol;
      
VarSetvarnameNzVarGetvarname ) ) + profit );
  }
  else
  {
      
varname "short_" symbol;
      
VarSetvarnameNzVarGetvarname ) ) + profit );
  }
}
//
SetCustomBacktestProc"" );
//
/* Now custom-backtest procedure follows */
//
if ( Status"action" ) == actionPortfolio )
{
    
bo GetBacktesterObject();
    
//
    
bo.Backtest(); // run default backtest procedure
    //
    
tradedSymbols ",";
    
//
    //iterate through closed trades
    
for ( trade bo.GetFirstTrade( ); tradetrade bo.GetNextTrade( ) )
    {
        
ProcessTradetrade );
    }
    
//
    //iterate through open positions
    
for ( trade bo.GetFirstOpenPos( ); tradetrade bo.GetNextOpenPos( ) )
    {
        
ProcessTradetrade );
    }
    
//
    //iterate through the list of traded symbols and generate custom metrics
    
for ( 1; ( sym StrExtracttradedSymbols) ) != ""i++ )
    {
        
longprofit VarGet"long_" sym );
        
shortprofit VarGet"short_" sym );
        
allprofit Nzlongprofit ) + Nzshortprofit );
        
// metric uses 2 decimal points and
        // 3 (calculate sum) as a "combine method" for walk forward out-of-sample
        
bo.AddCustomMetric"Profit for " symallprofitlongprofitshortprofit2);
    }
}
//
SetOption"MaxOpenPositions"10 );
//
Buy CrossMACD(), Signal() );
Sell CrossSignal(), MACD() );
Short Sell;
Cover Buy;
SetPositionSize10spsPercentOfEquity 

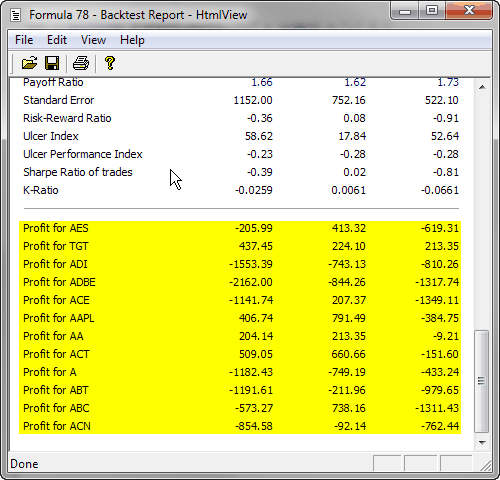
Once we run the Backtest, we will get the following output in the report, showing individual profit/loss figures for each symbol in test.

Per-symbol profit

If you prefer percent profits instead of dollar profits, just replace GetProfit() call with GetPercentProfit().

Position sizing based on risk

One of most popular position sizing techniques is Van Tharp risk-based method. Van Tharp defines risk as the maximum amount that can be lost in a trade. Typically you limit your loses by setting up a maximum loss stop.

The amount risked should not be confused with amount invested. If your stop is 15% away from entry price, in worst case you risk losing 15% of the position size (amount invested), not the entire amount. So risk practically means the amount of maximum loss stop.

Now, imagine that we only allow to lose 1% of entire portfolio equity in single trade. If our stop is placed 15% away, it means that to risk just 1% of entire equity we can put 1/15 part of our available equity into this trade. As we can see desired position size is inversely proportional to stop amount.

Buy CrossCMAC20 ) ); // some trading rules
Sell CrossMAC20 ), );
//
PositionRisk 1// how much (in percent of equity) we risk in single position
TradeRisk 15// trade risk in percent equals to max. loss percentage stop
PctSize 100 PositionRisk TradeRisk;
//
ApplyStopstopTypeLossstopModePercentTradeRiskTrue );
SetPositionSizePctSizespsPercentOfEquity )

Let us see how it works, say we have equity of $60,000, and we only want to risk 1% in single trade ($600). We set our protective stop to 15%. If stock entry price is say $20, we would put our protective stop at $20-15% = $17, so we will risk $3 per share. Given the fact that we want to risk only $600 in that trade, we could buy 200 shares (position risk 200 * $3 = $600). 200 shares @ $20 each gives position value of $4000. $4000 represents 6.667% of $60,000 and this is actual percentage position size we would open. As we can clearly see 6.667% is what we would get if we divide 1 (percent position risk) by 15 (percent loss amount): 1/15 = 6.667%

Instead of setting our stop as fixed percentage, we can use more sophisticated methods. For example we can adjust our maximum loss (so the risk) dynamically, using average true range, so it will get wider if stock is volatile and narrower if stock prices move in a narrow range. Say we want to set our stop to twice the amount of ATR( 20 ) at the entry bar and risk 3% of portfolio equity in a single trade:

Buy CrossCMAC20 ) ); // some trading rules
Sell CrossMAC20 ), );
//
RiskPerShare =  ATR20 );
ApplyStopstopTypeLossstopModePointRiskPerShareTrue );
//
// risk 3% of entire equity on single trade
PositionRisk 3;
//
// position size calculation
PctSize =  PositionRisk BuyPrice RiskPerShare;
SetPositionSizePctSizespsPercentOfEquity )

This time our maximum loss (so the risk per share) is expressed in dollars not in percents. Let us verify the above calculation. Assume that our equity is $90,000, stock price is $18, ATR(20) is $1. Now risk per share (the stop amount) equals 2 * $1 = $2, so our calculated position size (required % of equity) from the above formula would be:

PctSize = 3 * $18 / $2 = 27%

27% of $90,000 means trade size of $24,300, i.e. 1350 shares (@ $18 each). Since we risk $2 on each share, the total risk is $2 * 1350 shares = $2700, which is exactly 3% of our total equity ($90,000 * 3%).

In case of futures, we would need to take into account the fact that our position size depends on Margin Deposit, while the stop size (expressed in dollars) depends on the Point Value, so the position sizing formula would need to be modified.

Buy CrossCMAC20 ) ); // some trading rules
Sell CrossMAC20 ), );
//
RiskPerContract ATR20 );
ApplyStopstopTypeLossstopModePointRiskPerContractTrue );
//
// risk 1% of entire equity on single trade
PositionRisk 1;
PctSize =  PositionRisk MarginDeposit  / ( RiskPerContract PointValue );
SetPositionSizePctSizespsPercentOfEquity )

Let us assume that we are trading a contract with $5000 margin deposit, point value $50, our equity is 1 million and ATR(20) is equal 5 big points. Risk per contract is then 10 big points. Now the above formula would give us:

PctSize = 1% * $5000 / ( 10 * $50 ) = 10%

10% of our 1 million equity is $100K, which allows us to buy 20 contracts (20 * $5000 each). Since our risk is 10 big points and each big point has a value of $50 we are risking 10 * $50 = $500 per contract. We have 20 contracts so entire position represents a risk 20 * $500 = $10,000 which is 1% of our 1 million equity.

How to draw regression channel programatically

Built-in drawing tool allows to place regression channel on the chart manually and the study works on regular Close array as input. The power of AFL allows to automate this task and draw a customizable regression channel automatically in the chart or choose any custom array for calculation.

Here is a sample coding solution showing how to code Standard Deviation based channel. The Parameters dialog allows to control the array the channel is based upon, number of periods used for calculation, position and width of the channel.

lookback Param"Look back"201200);
shift Param"Shift"0020);
multiplier Param"Width"10.2550.25 );
color ParamColor"Color"colorRed );
style ParamStyle"Style"styleLine styleDots );
pricestyle ParamStyle"Price style"styleBar styleThickmaskPrice );
//
// price chart
PlotClose"Close"colorDefaultpricestyle );
//
array = ParamField"Price field", -);
//
BarIndex() + 1;
lastx LastValue) - shift;
//
// compute linear regression coefficients
aa LastValueRefLinRegIntercept( array, lookback ), -shift ) );
bb LastValueRefLinRegSlope( array, lookback ), -shift ) );
//
// the equation for straight line
Aa bb * ( - ( Lastx lookback ) );
//
width LastValueRefStDev( array, lookback ), -shift ) );
//
drawit > ( lastx lookback ) AND BarIndex() < Lastx;
//
// draw regression line...
PlotIIfdrawityNull ), "LinReg"colorstyle );
// ... and channel
PlotIIfdrawitwidth*multiplier Null ), "LinReg UP"colorstyle );
PlotIIfdrawitwidth*multiplier Null ), "LinReg DN"colorstyle )

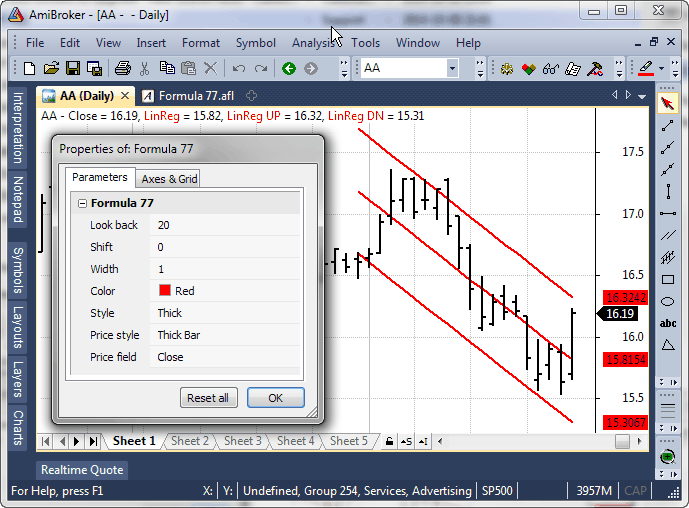
Here is the picture that shows how it looks:

Regression in AFL

What are constants in AFL and how they work

The AFL language contains many pre-defined words like: shapeUpArrow, stopTypeTrailing, colorRed, styleThick, inDaily and many more. These are examples of constants. As written in AFL language specification (http://www.amibroker.com/guide/a_language.html): Constants are tokens representing fixed numeric or character values.

To better explain what this means, let us consider example of PI constant, which equals 3.14159265358979….. PI is the name of constant we use this name in mathematical equations, because it is easier and more practical to use than using the numerical value each time. Constants in AFL serve the same purpose, each of these words represents certain value properly interpreted by the program in the context they are used.

That is why using the following statement in backtesting code:

ApplyStopstopTypeTrailingstopModePercent10 )

is much better to use than cryptic statement like:

ApplyStop2110 )

Both commands are equivalent, because value of stopTypeTrailing constant equals 2 and value of stopModePercent constant equals 1, yet the first version is much more understandable.

There is also another reason to use pre-defined constants rather than hard-coded numbers in the code. If for any reason the internal value of given constant changes due to development needs – all formulas using constants will continue to work properly (because new version would interpret them properly), while hard-coded numbers may change the code execution. For example – inWeekly and inMonthly constants have changed with introduction of N*inDaily timeframes, however if we always used:
TimeFrameSet( in Weekly ); in the code, then such internal change does not really affect our formulas at all.

There is one more example worth discussing – in the documentation of PlotShapes function we can find:

PlotClose"Price"colorBlackstyleCandle );
//
Buy CrossMACD(), Signal() );
Sell CrossSignal(), MACD() );
//
shape Buy shapeUpArrow Sell shapeDownArrow;
//
PlotShapesshapeIIfBuycolorGreencolorRed ), 0IIfBuyLowHigh ) )

So – what does the multiplication mean in the above context? If we remember that constants are in fact just numbers, and boolean True in AFL has numeric value of 1, while boolean False has numeric value of 0, then:

– if Buy is True (equals 1) and Sell is False (equals 0), then the result of such calculation will be

shape = 1 * shapeUpArrow + 0 * shapeDownArrow = shapeUpArrow

– if Buy is False (equals 0) and Sell is True (equals 1), then the result of such calculation will be:

shape = 0 * shapeUpArrow + 1 * shapeDownArrow = shapeDownArrow

The above approach is kind of shortcut that saves using conditional statements. It would work correctly only if Buy and Sell signals never occur on the same bar and only if we assign just 0 or 1 (False / True) to Buy and Sell arrays. Otherwise the result of calculations would be different. The internal value of shapeUpArrow is 1 and ShapeDownArrow is 2, so in situation, where both Buy and Sell signals were true, we would get

shape = 1 * shapeUpArrow + 1 * shapeDownArrow = shapeUpArrow + shapeDownArrow = 1 + 2 = 3

So – we would then pass number 3 to PlotShapes function and this is neither shapeUpArrow nor ShapeDownArrow, but a different shape. That is why in general case it is better to use conditional function IIf, like shown below:

shape IIfBuyshapeUpArrowIIfSellshapeDownArrowshapeNone ) )

This way we are always sure that returned value will be shapeUpArrow or shapeDownArrow or shapeNone.

How generate backtest statistics from a list of historical trades stored in a file

Apart from testing mechanical rules based on indicator readings, backtester can also be used to generate all statistics based on a list of pre-defined trades, list of our real trades from the past or a list of trades generated from another software.

To achieve that, first we need to create an input information for AmiBroker where it could read the trades from. A convenient way would be to use an input file in text format, which could store information about trades, including the type of transaction (buy or sell), dates and position sizes. A sample input file may look like this:
Symbol,Trade,Date,Price,Shares
AAME,Buy,2000-04-06,2.66,375.94
AAME,Buy,2000-04-10,2.66,378.922
AAPL,Buy,2000-04-27,31.23,32.0862
AAON,Buy,2000-04-06,3.19,313.48
ABAX,Buy,2000-04-26,7.67,132.101
AB,Buy,2000-04-25,20.23,50.0337
A,Buy,2000-04-27,84.66,11.8362
AAME,Buy,2000-05-10,2.6,373.627
ABCB,Buy,2000-05-11,6.08,159.406
A,Buy,2000-05-15,82.27,11.736
AAON,Buy,2000-05-18,3.84,246.242
AB,Buy,2000-05-15,20.84,46.3303
ABAX,Buy,2000-05-18,5.84,161.913
ABCB,Buy,2000-05-15,6.08,158.803
AAME,Buy,2000-05-19,2.6,363.763
AB,Buy,2000-06-05,22.78,43.3501
ABC,Buy,2000-05-18,4.49,210.595

We can read and backtest such input with the formula presented below. It is important to remember that this particular code can work with input files of identical format (columns in identical order, signals specified with exact Buy / Sell words, position sizes specified as shares). Changing the input format would also require to update the formula to match the input.

Path to the file is specified in the very first line (note that double backslashes need to be used).

The formula reads the file line by line, then on a bar with matching date/time it generates a new Buy or Sell signal that is then combined with existing signals (coming from other bars).

file "C:\\TEMP\\trades.csv"// change this to real location of your data file
dt DateTime();
//
// Initialize variables
Buy Sell possize 0;
//
fh fopenfile"r" );
//
if( fh )
 {
     while( ! 
feoffh ) )
     {
         
line fgetsfh );
         
// get the ticker symbol from the file
         
sym StrExtractline);
         
// if ticker matches current symbol
         
if ( Name() == sym )
         {
             
// extract data from line of text
             
trade StrExtractline);
             
trade_datetime StrToDateTimeStrExtractline) );
             
price StrToNumStrExtractline) );
             
shares StrToNumStrExtractline) );
             
//
             
if ( trade == "Buy" )
             {
                 
newbuy dt == trade_datetime;
                 
Buy Buy OR newbuy// combine previous buy signals with new
                 
BuyPrice IIfnewbuypriceBuyPrice );
                 
possize IIfnewbuysharespossize );
             }
             
//
             
if ( trade == "Sell" )
             {
                 
newsell dt == trade_datetime;
                 
Sell Sell OR newsell// combine previous sell signals with new
                 
SellPrice IIfnewsellpriceSellPrice );
             }
         }
     }
     
//
     
fclosefh );
 }
 else
 {
     
Error"ERROR: file can not be open" );
 }
//
SetPositionSizepossizespsShares )
« Previous PageNext Page »