Introduction
AmiBroker charting engine allows object-oriented manipulation of all drawings. Now you can simply move, resize, cut, copy, paste and delete all drawing objects with ease. This chapter will guide you though most important aspects of using charting tools.
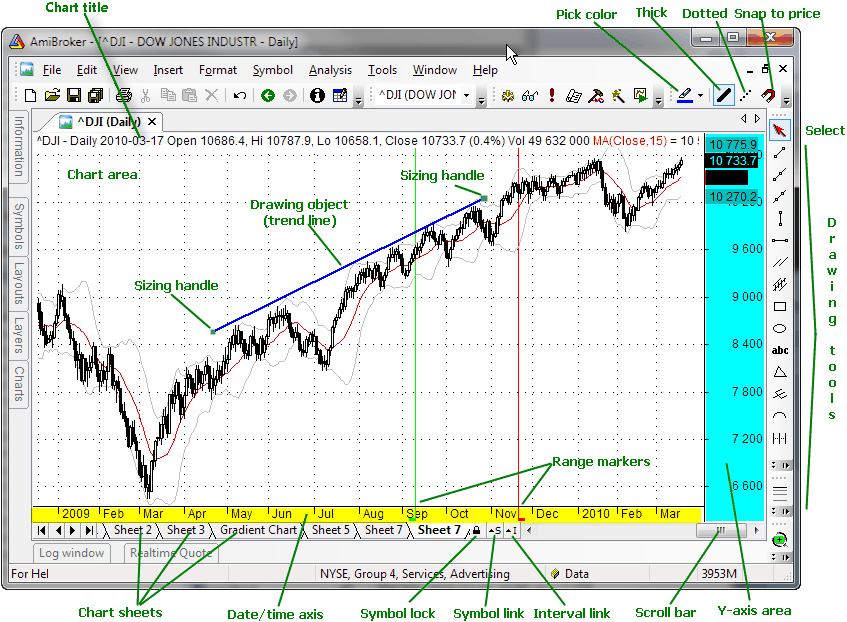
Let's now take a look at the user interface:
As you can see the in the center we have chart area in which price chart with moving average and Bollinger bands is plotted (you can control the apperance of built-in charts from Tools->Preferences window).
In the bottom of the chart you can see date axis (marked with red color), and below scroll bar and chart sheets tab control. Scroll bar can be used to display past quotes, while sheet tab allows to view different chart pages/sheets (click here to learn more about chart sheets).
To the right you can see Y-axis area (marked with blue color) that shows Y-scale and value labels. Value labels are color fields that display precisely the "last value" of plots. "Last value" is the value of the indicator (or price) for the last currently displayed (rightmost) bar. Y-axis area is used also to move/size chart vertically.
Next to the right is a drawing objects toolbar that allows you to choose from available drawing types (note that only most popular tools are shown here, complete set is available from Insert menu). A special tool called "Select" (red arrow) is used to select/move/resize already drawn objects and to select quotes from the chart.
In the upper part you can see formatting toolbar that allows you to quickly modify color, style (thick/dotted) and mode (snap to price) of currently selected drawing object.
In the picture you can also see the trend line drawn with sizing handles marked. These handles are used to drag/size the object as will be explained below.
Basic operations
Scrolling
To scroll the chart forward/backward just drag scroll bar thumb or use < and > arrows on the left and right sides of the scroll bar. Note that using < > scroll bar arrows allows you to move chart by one bar. To scroll the chart you can also use the mouse equipped with a wheel. Just roll the wheel up and down to scroll back and forward.
Zooming
To zoom the chart (increase or decrease number of data points (bars)
displayed) you can use either View->Zoom menu, zoom toolbar or mouse
wheel.
You can also zoom by dragging the left or right edge of scroll bar.
There are following options available: zoom-in - decreases the number
of data points displayed, zoom-out - increases the number of data points displayed,
zoom-all - displays all available bars, zoom-normal resets number of bars
displayed
to the value defined in Tools->Preferences->Charting. Zoom-in
and zoom-out options are accessible directly from the View toolbar. (see picture
below). To zoom using mouse wheel just press and hold down CTRL key and roll
the wheel. You can also zoom to any from-to range selected on the chart (see
'Marking range' later in this tutorial)
Shrinking, expanding and moving Y-axis scale
To move Y-axis scale hover the mouse to Y-axis area (marked with blue color in the picture above) and you will see that cursor changes to up/down arrow. Now you click and drag up/down Y axis and release button when the axis is in the correct position.
To shrink/expand Y-axis scale: press down SHIFT key and click in the Y-axis area, now shrink/expand Y axis scale by moving your mouse up and down. Release the button to finish.
To reset Y-axis scale and position simply double click in the Y-axis area.
Changing bar interval (periodicity)
You can easily switch between daily/weekly/monthly and intraday intervals by choosing it from View menu and pressing the toolbar button (see below).
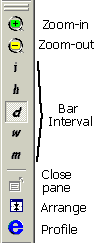 |
The toolbar uses following notation for intervals - i -intraday, h - hourly, d - daily, w - weekly, m - monthly. The i represents "base" intraday interval as defined in File->Database Settings. Remaining intraday intervals are available from View->Intraday menu. The interval setting affects active window only, so each window can have different interval. Please note that intraday intervals are disabled if your database is in end-of-day mode. Intraday modes are available only for databases that have "Base time interval" in File->Database Settings set to anything less than end-of-day. If you for example set "Base time interval" in File->Database Settings to 5-minute, all chart periodicities from 5-minutes up will be enabled. |
The following intervals are built-in:
In addition to that you can define 5 custom n-minute bar intervals and 5 custom n-tick intervals in Tools->Preferences->Intraday. Custom intervals are available from View->Intraday menu only.
Selecting a quote
You can very easily see the past quote and values of indicators by using "select" mode. To select past quote first switch to "Select" mode (red arrow in the toolbar) then click in the chart area (but not on the drawing object). A vertical line will show up marking the quote under the cursor. The chart title will display this bar quote. Indicator panes will show indicator value for given bar. Once quote is selected you can move to previous/next quote using keyboard left and right arrow (cursor) <- and -> keys.
To switch off quote selection either click again on the line or click in the date axis area (marked with red color in the picture above) or click in the right margin (blank quotes) area. When selection is off chart title displays the values for last visible bar.
Marking range
To show range marker just double click the chart at the beginning of the range and double click again at the end of the range. You can also use F12 key in conjunction with "select" mode (described above). Just select quote and press F12 for begin and SHIFT+F12 for the range end. You can switch off the range marker by pressing CTRL+F12 key or double clicking in the same place twice.
Range markers can be used to select zoom-in range (View->Zoom->Range) and to perform calculations on selected values via BeginValue and EndValue AFL functions.
Adding / closing chart panes
Each window can consist of several panes displaying various charts / indicators. To display a new indicator in a separate chart pane just find the indicator in the Charts list (use Window -> Charts menu) and double-click on the indicator name. For more information see Drag&drop charting tutorial.
To close any chart pane: click on the pane, then use either View->Pane->Close from main menu or click on the pane with right mouse button and choose Close from context menu.
Linking and locking chart
Multiple chart windows (that were open usign File->New->Default Chart or File->New->Blank chart) can be interval-linked, symbol-linked using appropriate small "S" and "I" buttons that appear on the left side of the scroll bar. When you click on button the menu showing colors will pop up, select one color from 2 or more charts and symbols linked using same color will be linked using symbol and/or interval. Linking means that change of the symbol and/or interval in one of the linked windows automatically changes symbol and/or interval in all linked windows using same link color.
You can also prevent symbol from being changed for given chart. It can be done by turning on little pad lock button ("Symbol Lock") on the right side of the scroll bar. When chart is symbol-locked, it will not allow to change the symbol selected unless the lock is released (by pressing pad lock button again).
Using drawing tools
AmiBroker features extensive set of drawing tools:
 |
The following tools are available:
They are available from Insert menu and Draw toolbar. Each drawing object can be moved, resized, copied, deleted and modified after it is drawn.
|
To draw an object on the chart switch on appropriate tool button (see picture below) and start drawing on the chart by pointing the mouse and pressing left mouse button where you want to start the drawing. Then move the mouse. Study tracking line will appear. Release left mouse button when you want to finish drawing. You can also cancel study drawing by pressing ESC (escape) key.
If you hover your mouse over the object you will see that cursor shape changes in the proximity of the object. This means that
If cursor is near either end of the object it will change its shape to sizing
pointer:

If the cursor is near remaining parts of the object it will change its shape
to moving pointer:

Once object is drawn it can be selected, moved, resized, deleted, copied.
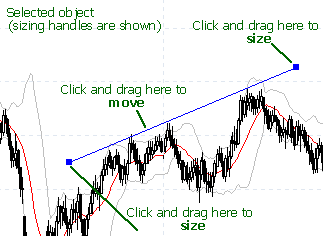 |
To select the object simply move the mouse over the object so "moving pointer" appears and click once - the object will be marked so the sizing handles (see first picture) will appear. To de-select click in the blank chart space. To size the object click on the sizing handle and drag to the desired location as shown in the picture. To move the object click on any other part of the object and move to the desired location. |
To delete object - select it first and press DEL (DELETE) key on the keyboard or use Edit->Delete menu or use Delete toolbar button.
To copy the object to the clipboard - select it first and press Ctrl+C or use Edit->Copy menu or use Copy toolbar button.
To cut the object - select it first and press Ctrl+X or use Edit->Cut menu or use Cut toolbar button.
To paste the object from the clipboard press Ctrl+V or use Edit->Paste or use Paste toolbar button. Pasted object will drawn in the exactly same location as copied one and will be selected automatically so you can move it to a new location.
To apply color or style to the object select it and use Format menu or Format tool bar buttons to change color, thick, dotted and snap to price styles. Note that you can also select color and style of the object before drawing new object: simply deselect previous object (if any), change color / style selections and draw new object.
To modify properties of the object - either double click it or use Edit->Properties menu or Alt+ENTER key
To delete all objects use Edit->Delete All menu
Further information
To learn more about drawing tools please read Drawing tools reference chapter.